iPhoneography Insights: No Focus

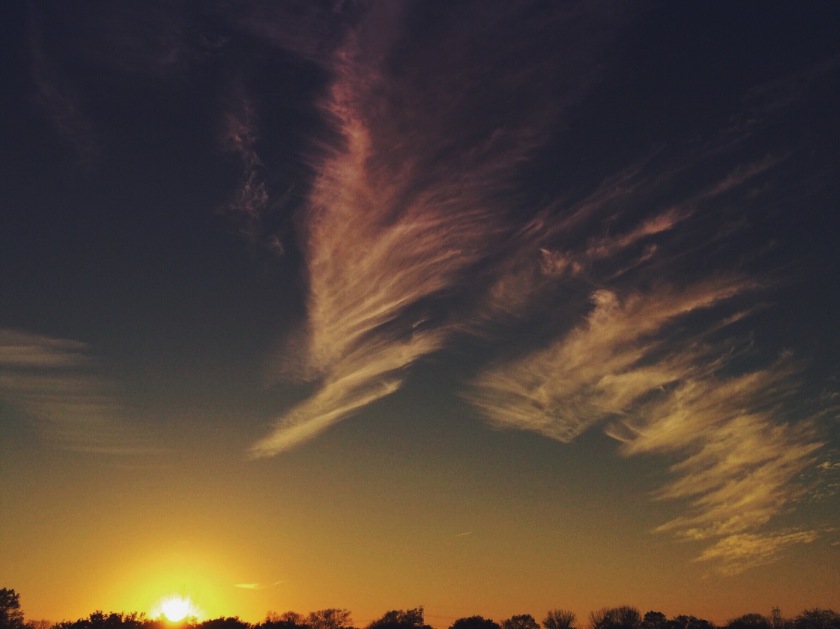
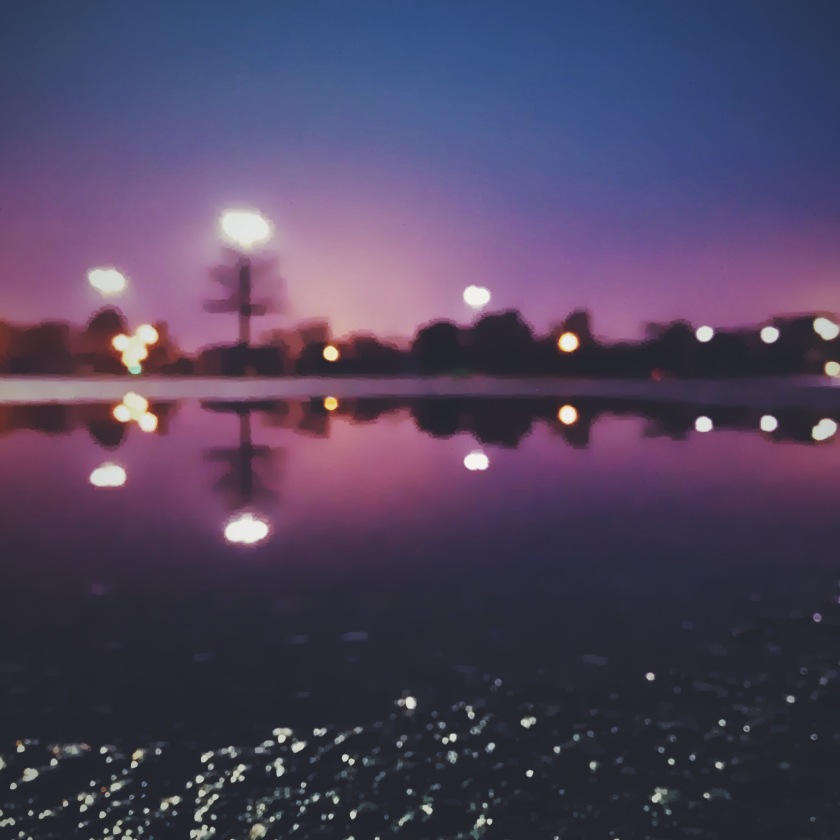
When I came upon this puddle there wasn’t anything too special about it. But the sun had just set, and I liked the colors in the sky.

In this post I’ll show you how I used Mextures to take the colors up a notch and create a surreal result.

iphoneography-insights-no-focus-1

I took a few photos and didn’t review them on the spot since I was in a rush. Out of all the photos taken, I actually liked this one even though it’s out of focus. That’s where I got the title after all. 😉

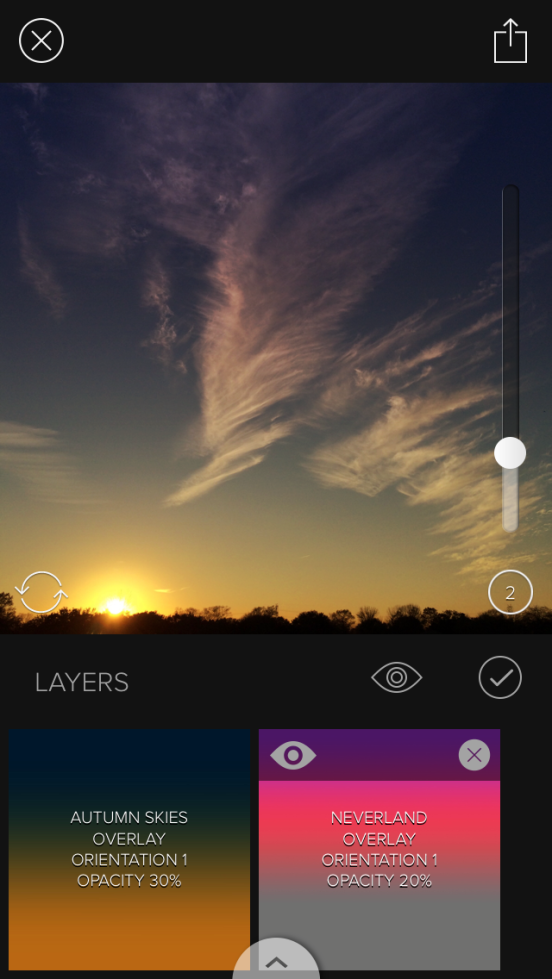
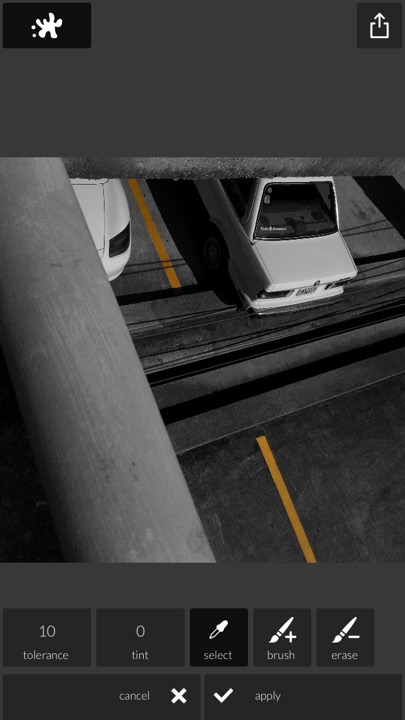
I applied the “Dusk” gradient to both the top and bottom of the image. Notice the different orientations in the screenshot on the right.

After exporting from Mextures, I reduced the noise using the “Smooth” feature in Pixlr. Too much smoothing can ruin an image, but, since this one is out of focus, it worked out really well. Lastly, I finished it off with a preset from VSCO Cam that really brought out the purple.

Check out more iPhoneography Insights here.

And don’t forget to follow me on Instagram!

When You Don’t Have Your Camera With You

I wish I would’ve brought my camera along, now I’m stuck with this crappy cell phone shot!

This is often proclaimed by the photographer with more capable gear that’s been left at home. I know how you feel. There have been plenty of instances where I’d wish I had my DSLR or film camera with me:

  • When I see a perfect sunset
  • When I spot a cool car
  • When I’m in low light
  • When the subject is far away
  • When I want to take a portrait of someone on film (Because it’s cool and the colors look good)

The situations I’m describing aren’t even that bad though. And I’ve learned to not spend a moment in regret. Because, here’s the thing, the phone is a camera too. Quite a capable one. The best if you ask me.

Instead of spending a moment in regret and maybe not taking a photo, I take a moment to be grateful.

  • Grateful for being alive
  • Grateful for being able to see and move
  • Grateful for the challenge of creating an awesome photo with my current constraints/limitations

Even if I didn’t have my phone with me, I embrace the opportunity to improve my Vision. I take the shot with my mind.

Maybe it won’t last as long.

Maybe it will.

The last thing I want is sight without the ability to see. Vision, it’s more than sight.

Created with the iPhone.

Created with the iPhone 5S.

What do you do when you don’t have your camera with you?

iPhoneography Insights: Wispy

As you can tell from the title, the wispiness of the clouds definitely made this photo a great capture. But I wanted to take this opportunity to have a little more fun with it and give you a brief demonstration of how I use one of my favorite apps — Mextures.

According to the app’s description, Mextures is the best app for applying film grain, textures, light leaks, and beautiful gradients to your images in seconds.

I waited for the sun to reach the horizon.

I waited for the sun to reach the horizon.

As you’ll see in the screenshot below,  the first gradient I used amplifies the warmth of the sky. The second gradient was used to add more color to it.

One of the awesome features of the app is that it allows you to perform non-destructive edits, i.e., you can go back and change how strong/soft you want the gradient to be.

iphoneography-insights-wispy-2

After editing the photo in Mextures, I put the finishing touches using a filter in VSCO Cam.

View the apps in iTunes:

Check out more iPhoneography Insights here.

And don’t forget to follow me on Instagram!

The Three Qualities of the Best Camera

What makes a camera the best?

Is it…

  • the amount of frames it can shoot per second?
  • the amount of megapixels it has?
  • how far it can zoom?

These are some common considerations.

But what makes a camera the best can be much simpler than that.

The best camera is the one that’s with you.

– Chase Jarvis

It is, isn’t it? I couldn’t agree with Chase more. For many of us, that camera would be our smartphone. It certainly is for me. Below, I go deeper on the three qualities that make a camera the best:

  1. It’s always with you. Since my smartphone is my primary source of communication, I can’t have it anywhere but with me. No matter how much I’d try, my DSLR/film camera would not always be with me. I wouldn’t carry it around work all day. I wouldn’t bring it out in the rain. The list goes on.
  2. It’s always ready. Since my smartphone is always with me, being ready is as quick as taking the phone out of my pocket and swiping once. Smartphones were not always this way. I used to have to swipe, enter a pin/password if required, and then launch the camera app. Three steps. The fact that both Android and iOS have made it quicker to access the camera is a testament to the vital role of photography for smartphones.
  3. It creates an environment for photography. Since my smartphone is always with me and always ready, it’s difficult to not take a photo. Not to mention, settings (e.g., aperture and shutter speed) are nowhere to be found. It effectively eliminates the littles obstacles.

Don’t get me wrong, I love my DSLR and film cameras and I bring them with me when I intend to. But my iPhone is with me way more than any other device in my life. And it’s encouraged me to create so many more photos than I ever imagined I would.

Most of these were created last month on my Instagram.

What’s your best camera? Feel free to post a link to some shots you’ve created with it as well.

iPhoneography Insights: Line Break

Whenever I do a colorsplash, or selective coloring, it most often involves a car and its tail lights.

They’re fun to make stand out. Plus, I love red. But this time around, yellow caught my eye. I’ll show you how I used VSCO Cam and Pixlr to create the Line Break.

Straight out of the camera.

Pixlr is usually step one when I’m doing a colorsplash. The feature inside the app is actually called just that, Splash. Sometimes the app will be able to do most of the work for you (i.e. you select a yellow spot and everything that’s not yellow becomes monochrome). Other times, you’ll have to use brush and erase to make your selection because the app can’t distinguish correctly.

To finish it off, I picked a preset from VSCO Cam that added more contrast and mood. It was one from the “Street Etiquette” pack if I remember correctly.

View the apps in iTunes:

Check out more iPhoneography Insights here.

And don’t forget to follow me on Instagram!

Photo-essay: Creative Feast at the Ogden

Despite being a native New Orleanian, I’ve never been to the Ogden Museum. It was the last day for a PhotoNOLA exhibition called Self Processing: Instant Photography. And although I was eager to see the instant photographs and cameras, the museum itself provided a creative feast both outside and in.

This is the renowned ‘Before I die’ wall, where visitors may express something from their bucket list. Fortunately, the rain from the day before left a puddle.

Red.

Going up.

Frame in frame, rectangles, and squares.

Silhouette and shadow.

This is where admission stickers go when you leave.

iPhoneography Insights: Brick Road

For this post, I decided to give a little more detail than the previous ones in this project. Most of the time, I don’t know beforehand whether or not I want to write a post about the post-processing of a certain photo.

But, if I’m able to decide before or while I’m editing, it’s easy for me to get some screenshots and upload it to my OneDrive for this.

Here’s the original photo of a hallway at my local library.

I purposefully composed to have the lines of the brick wall meet the two corners because I’d imagined a brick road. Not yellow bricks, but it’ll do. First, I opened the image in SKRWT where I did most of the transformation.

Using the ratio tool, I compressed the image horizontally so both corners of the brick wall would still be in the square crop. This tool does a good job of compressing images in order to fit things in a different aspect ratio.

After exporting from SKRWT (image on the left), I used the heal tool in Pixlr to remove a lot of the distractions on the right side of the brick road. To finish it off, I applied a black and white preset from my favorite and most-used app (in 2014 at least), VSCO Cam. I think the black and white really brings focus to the window light and makes the result more surreal.

View the apps in iTunes:

Check out more iPhoneography Insights here.

And don’t forget to follow me on Instagram!